Monday, 14 July 2014

VICTORIAN BEAD RETREAT

Day Two: Thursday 10.07.2014

After a long night up with my roomies, I still managed an early start, up at 6.45am to be showered & organised for my first class. This is the first year I have participated as a tutor. I could hardly contain my excitement. So off I went to work off some nervous energy before breakkie, I organised the table arrangements for the morning classes, as well as setting up my own area.
Once everything was all done, I made my way to the mess hall  to enjoy a hearty breakfast starting at 8am with classes beginning at 9.

CLASS SET UP INTRODUCTION TO MICRO SCREWS & RIVETS

I had a class of 6 for my first session,with the ladies all being of varying ages & backgrounds within the world of jewellery design.
We went along very smoothly with all set projects being completed. !!!! Woohoo & yippee. ( I felt so happy & such a sense of achievement) Here I was worried I wouldn't have enough for them to do in the 3 hours. I enjoyed every moment of the class with these wonderful women.

At the same time as my class was running other classes where also being conducted both in the conference hall where I was stationed as well as in the leaders cottage & the big room at the rear of the mess hall.

BEZELLED RIVOLI EARRINGS
 
GLASS BEAD MAKING
Featured above left is a class run by Cheryl McLeod, she was teaching Bezelled Rivoli Earrings, FB page https://www.facebook.com/BeadWeaving (picture from Alida)
Featured above right (picture by Katy Chappelow) there was Lamp working taught by Pauline Delaney https://www.facebook.com/PaulineDelaneyLampworkGlassBeads

We also had Folforming run by Liz Reed of http://www.lizreedjewellery.com/ 
Flower Power Polymer clay class run by Karen Cooke photo's below. Karen to the left & Liz to the right

FLOWER POWER POLYMER CLAY
FOLD FORMING WITH LIZ REED

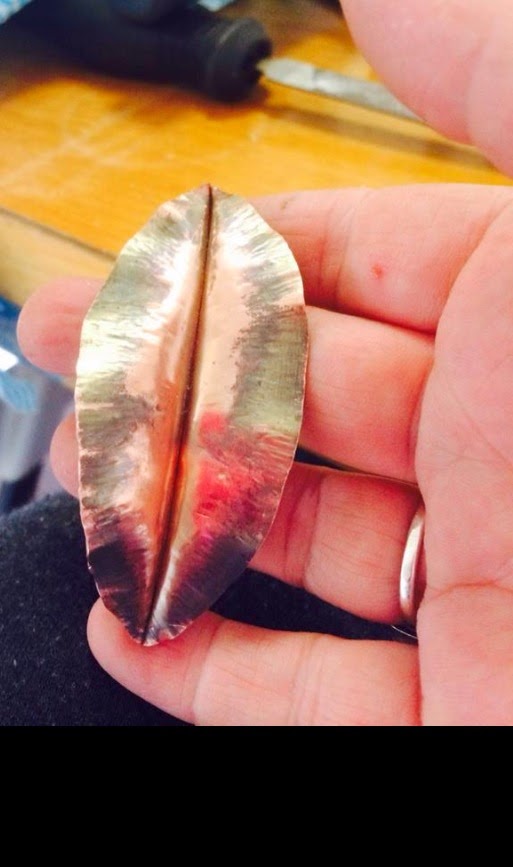
FOLD FORMED LEAF
PHOTO KAREN COOKE
MICRO MACRAME WITH KAT GRAY
Other classes run in the same time slot where "Micro Macrame' with Kat Gray, "Freeform Wire Bezel" with Terri McDonald, "Working with Earthenware Clay Basic" with Natalie Fletcher-Jones from Peruzi https://www.facebook.com/Peruzi.net

After the morning classes had been completed it was time for a chill & a regroup over lunch. Loads of excited chatter filled the lunch room as we all eagerly discussed what we had done, & off course who's got what next. Little squeaks of excitement & phrases such as "Oh Yah I am in that class with you" could be heard across the room.

We also had a very neat surprise waiting for us at lunch this day. Our retreat organisers had been busily creating goodies bags for all attendees. Loaded with lots of wonderful pieces from our sponsors.

GOODY BAGS RECEIVED BY RETREAT ATTENDEES 
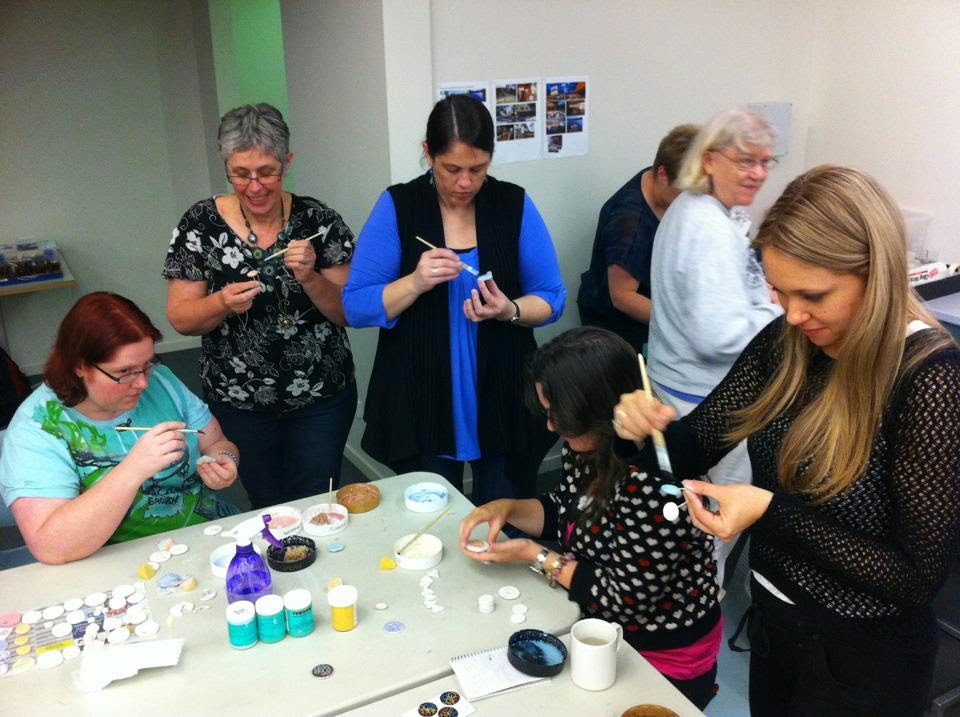
For me after lunch I was in Natalie's  "Toggles/Connectors with Stoneware Clay" class.
I've had the privileged of  previously been taught by Nat & new it was to be a very relaxing class. Designing & sculpting into clay. The 3 hour session simply flew by. 
MID CLASS CLAYING SHOT
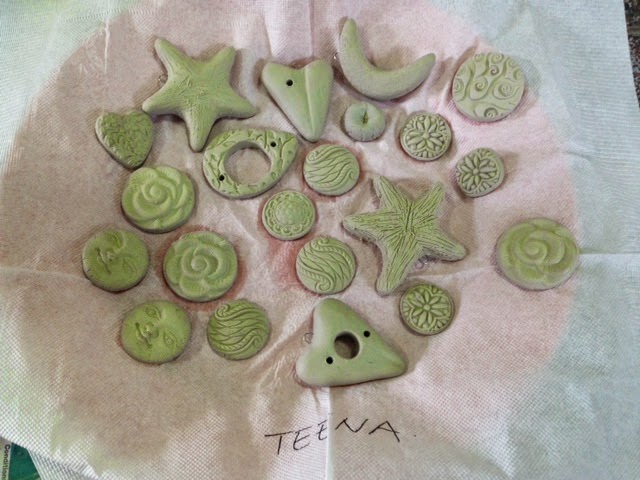
MY STONEWARE PIECES
SOME ARE TOGGLES THE REST ARE CABS ETC
Other classes being conducted at the same time 1.30pm till 4.30pm where "3D Beaded Components" with Yvonne Ireland pictured below left (photo Nikki McPhan) "Beaded Triangles" run by Christina Armstrong pictured below right.
We also had "Celtic Knotting" run by Sharon Hutton, a continuation of the "Lampworking" run by Pauline & continuing on from the morning also was "Freeform Wire Bezel" with Terri. Val Spencer-Sun was teaching "Viking Weave with Pearl or Crystals", Liz Reed had started her sessions of "Bezel Set Rings" and Karen was finishing up her all day session with  "Flower Power Polymer Clay"
3D BEADED COMPONENT
SEONA WITH HER
COMPLETED BEADED TRIANGLES
WHICH BECAME EARRINGS

I decided that having a bit of free time between 4.30pm & 6pm (dinner) I would take a wander around the campus to see other classes as they where packing up. The girls in lamp working had been super productive after their session with Pauline. A stroll up the hill to Liz Reed's class where the ladies had been creating bezel set gemstone rings.....soooo delicious. It was the perfect time to catch up & look at all that had been created during class as everyone was relaxed and keen to show off there achievements.
Honestly there was so much creative energy the place was buzzing.

For the evening the retreat organisers had a wonderful themed party planned after dinner, so before we went off to dinner everyone retreated back to their cabins to get all dress up in the theme "Peace,Love Beads'
We were treated to a night of fun & frivolity by first picking a hippy flower from the bag & sitting at the relevant table. This was to encourage us all to sit with new peeps.We also had a  trivia section, a handbag scavenger hunt, best dressed comp & after party karaoke. UH HUH yeap! I did get up and sing a long with a big bunch off girls.......We ROCKED IT teeheeee cough, cough, LOL
Now for a bunch of happy snaps from the night.

ALL DRESSED UP READY TO PARTY

GROOVY SISTERS
WAY OUT MAN!


SOME SILLY TABLE ANTICS
FINALISTS IN THE BEST DRESSED COMP


To be a part of these fabulous retreats simply visit the Retreat website

Sunday, 13 July 2014

VICTORIAN BEAD RETREAT

DAY 1: Wednesday 09.07.14

Up early to finish getting organised to leave for the retreat. Lucky for me, no flying this year as it's based an hour from my home, down in Mount Eliza. A lovely easy drive straight down the Eastlink.

LOCATION OF RETREAT


Taking a moment to squeeze in a workout to calm the nerves & excitement of actually teaching this time round......
Also using this time to visualize in my mind all that I need to take, towels, pillows, hair dryer, chargers..... The list is endless.
However I did manage to become organised & ready to go two hours early. (I did discover once I arrived & unpacked I forgot my supply sheet for class) Oh well...At least I can email this to all students.


After some time filling activities I still managed to arrive before the 2pm check-in. So I chilled out in the car waiting patiently for other retreaters to arrive. The weather was slightly unfavourable but being winter I was prepared. The rain & cold however did not dampen the tranquillity & beauty of the selected venue.

MY FIRST IMPRESSION OF THE VENUE SO VERY LUSH & GREEN

The first person after myself to arrive was Karen Cooke. Karen had the list showing the bunking arrangements, so her & I registered the Retreats arrival & got to sorting out the cabins.
Slowly people began to trickle in & the buzz of the retreat had begun.
Once I was settled in my cabin I was off to help Sharon H with workshop area set up,  a lovely large conference area with kitchen/ stage & bathroom facilities. After the initial base setting up was done it was time to meet my roomies & take some time to wander & chat & put some faces to names.

MARY-ANNE & ALI


NAT & ANGIE

Late afternoon had come around & it was time to set up for the mini market. This was to take place after dinner.Where those who create & sell  kits, lamp work,ceramics & supplies all had the opportunity to sell their wares. Pictured above are Natalie from Peruzi http://www.peruzi.net/ as well as Angie who runs Chicky Babe Beads http://chickybabesbeads.com.au. To the right is a snap of both Mary-Anne & Ali Kelly who are both lamp workers.
After Mini-Market set up, with a majority of us all having arrived, it was time for our organisers Alida & Nikki to give us all a big warm welcome. This included a lovely welcoming speech from one of the YMCA camp organizers.
With the formalities out of the way it was time for dinner, I had certainly worked up an appetite during setting up time :-). With dinner complete some where heading off to get the Mini Market under way. Whilst others headed up to the area for those who wanted to sit & create. 
With no real plans at this point I happened to wander into the area where the Resin class was above to take place. As luck would have it I was able to partake. Our teacher for this class was Sue Connors from https://www.facebook.com/pages/SueNique-Designs/357352558207

MY POURED PIECES

DURING CLASS SHOT


A fabulous class with what looks to be great results. De-Moulding happens around 24-48 hours after we pour & then it's a butt load of finishing. 
With Resin class finishing around 9ish, I decided to head up to the big conference room for a bit more of a chit chat & see all the designs out for the challenge.
Each retreat has a theme & this one was "Flower Power"

CHALLENGE PIECES

CHALLENGE PIECES

CHALLENGE PIECES


Some absolutely magnificent work . With such a lot of wonderful ideas & creativity.

Phewwww what a day!!! Time for bed..so I thought LOL...... My cabin mates and I were up chatting & getting to know each other better till the wee hours. The sheer excitement of being here at the retreat was too great.
Looking forward to tomorrow.

The next retreat takes place in January in Canberra http://aussiebeadingretreats.com/
If you would like to be a part of the Aussie Bead Retreats please follow the links to the web pagehttp://aussiebeadingretreats.com/ & FB Page, https://www.facebook.com/AussieBeadingRetreats

All images & projects featured here in this Blog & on the Aussie Bead Retreats site are protected by IP laws of Australia. Photo's used have been done so with the permission of those who have taken the photo's.


Tuesday, 1 July 2014

TORCH FIRE ENAMELLING

So its been 18 months since I first discovered Torch Fire Enamelling at http://aussiebeadingretreats.com/ in Qld.
Now I am by NO means an expert & I am still learning about this technique every time I fire up the torch. This is simply me sharing with you my experiences so far. I strongly suggest you do either an online e course or an in person course before embarking down the road of Torch Fire Enamelling. I honestly feels knowledge is the key.

RESULTS FROM A DOUBLE CLASS 6 HOURS


I was lucky to have been taught by the fabulous Liz DeLuca who is a very well known & an established Glass Artist. Liz's classes are very detailed & a brilliant starting point.

http://www.creativeartyfacts.com.au/cubecart/index.php?_a=product&product_id=303
Click the link above to take a class with Liz.
Or an online e course with Barbara
http://www.paintingwithfirestudio.com/cgi-bin/commerce.cgi?search=action&category=1290

After my class with Liz, I came back to Melbourne armed with my Hot head Torch, enamels, mandrels & beads. Raring to take on the world of enamelling .

My first mistake was not to get into it straight away, I waited a couple of months & really found I had lost my confidence with the technique. I was seriously struggling, things were sticking to the mandrels I couldn't get bright colours & to top it all off I burnt my thumb, quite badly :-(.

At this point I decided I needed to go back to square one & reread all the info & see where I was going wrong.After going over all I had been taught & reading Barbara's books again I decided I needed a pulling station, this allows you to remove the beads from the mandrel with ease & at a less risk of being burnt.
http://www.paintingwithfirestudio.com/cgi-bin/commerce.cgi?preadd=action&key=1

Books to purchase by Barbara Lewis
http://www.paintingwithfirestudio.com/cgi-bin/commerce.cgi?search=action&category=1030

Once this arrived I got back into it & with much better results. Pulling beads of the mandrel had become a breeze. My other issue of muddy colours had also been resolved. A few quick chats with Liz to remind me about the sweet spot in the flame & making sure my gas was fresh. There is another gas called MAP gas which can give you much brighter colours however I am yet to locate a place to purchase this. I am simplu using my BBQ Gas tank& ensuring my gas is fresh.

The absolute basics to get started enamelling are

1) Enamels - Thompson enamels
2)A Hot head torch & a Tank of Gas
3)Mandrels of different sizes
4)Fire proof tiles set up underneath the torch
5)Safety Glasses, Breathing mask NO LOOSE CLOTHING & safe closed toed shoes, as well as good ventilation
6)Beads LOADS OF BEADS
7)Steel tweezers & a vessel of clean cold water.

All of these supplies can be readily bought online or in store with
Barbara Lewis http://www.paintingwithfirestudio.com/cgi-bin/commerce.cgi?display=home
Koodak http://www.koodak.com.au/main.php
Kays Artycles http://kaysartycles.com.au/

Once you start it truly is addictive & yes it can be extremely frustrating. However when you get the hang of it and see some of the brilliant results you can achieve it is all worth it. So now let me share with you some of my pieces which I have created using this technique.

START WITH BEADS & PRACTICE GETTING YOUR COLOURING RIGHT ANY THAT ARE NOT PAIRS CAN BE USED LATER AS INDIVIDUALS IN NECKLACES


COLOURS LAYERED

 Shown above are some of the basic iron based beads that you start out with. They are brilliant to practice on and unless you burn the enamel, all the non pairs can be used later.
Once you have mastered your bead making technique you can move onto other more challenging shapes & try out other techniques like building up colours.Such as the earrings featured to the left.

BEADS CREATED TO FIT DESIGN


The other brilliant thing I LOVE about Torch enamelling is when you don't have the right bead to match or make a piece work, you can simply whip a few up. As seen on these sweet Blue Bell earrings to the right.


I also discovered along the way that I could enamel Vintaj Brass components with great success.


EMBOSSED/ENAMELLED VINTAJ BLANKS

In the earrings featured to the left I first embossed them using the Vintaj embossing folders. I first burnt off the sealer that is on these blanks & gave them the first coat of clear & only one coat of colour.


I chose not to do a second coat as the enamel would have become too thick & hidden the detail.


During my 18 months of enamelling I have discovered that enamel can & will chip off if either not enamelled correctly in the first place, the metal is not suitable, is dropped onto a hard floor/surface or is too weak, can be bend during wear.
Featured below are some enamelled Copper flowers bought ready to go, teamed with enamel head pins, definitely a favourite thing of mine to make. The Copper leaves to the right have been given a dual layer for a deeper colour range

COPPER LEAVES DUAL COLOURS

COPPER ENAMEL FLOWER


Now to share some of the necklaces I have created using the beads that didn't quite make it as pairs of have been created just for a specific purpose.

THIS BEAD WAS OUT OF MISMATCHED PAIR BUT TEAMED UP SUPER WELL WITH THE LAMP WORKS & SWAROVSKI'S 


A LONG LARIAT STYLE

A CHOKER STYLE NECKLACE


Another two magnificent examples featured above of using up non pairs, it really does help you to become resourceful & certainly creates OOAK pieces that simply cannot be repeated.


A COPPER DISC ENAMELLED AS A MAIN FEATURE FOR THIS NECKLACE


I hope you have enjoyed hearing about my adventures so far in the world of enamelling. I could goon forever posting shots of all my creations but Alas, I do believe you would become bored LOL .I have a pinterest board dedicated to enamelling & free tutorials, so check it out & I hope it is off some help to you. http://www.pinterest.com/teena_germano/enamelling-tutorials/
Barbara Lewis also has a Facebook group for those who are either already enamelling or wishing to get involved https://www.facebook.com/groups/paintingwithfire/

I honestly do hope this sparks an interest for you to want to go out there & give it a try.
Happy creating :-) Teena


Sunday, 22 June 2014

THE BEADING RETREAT DAY 3

BEAD EMBROIDERY

DAY 3:

After another wonderful early start & a hearty brekkie,it was off to the first class for the day.

I was about to embark of my first adventure into Bead Embroidery.......I was very hesitant indeed.
However I was of course nervous for no reason,the class was run by a very accomplished teacher , Sharon Hutton & packed with wonderful experienced ladies, all of which were eager to lend a hand.


Now I must admit in the year & a bit it's been since I had attended this retreat I never did finish the project. Never the less it did lead to more beading, to which I thoroughly enjoy.

Now after a little break, we are off to our next class, I was SUUUUPPPER excited about this one. TORCH FIRE ENAMELLING...... Oh yes :-)

RESULTS OF A FUN ENJOYABLE ENAMELLING SESSION


Pictured above were the results of a double session of Torch Fire Enamelling,something I highly recommend you do if you ever have the chance.

The results are amazing and of course once you get over the fear of the flame ( I was a fraction scared in the beginning) there really is no stopping you.

I bought all the required tools to set up at home & do a bit here in there when a piece calls for it. It is a skill that required constant practice,which only makes the results more spectacular.

Our teacher was one Mrs Liz DeLuca based in Brisbane,Qld & runs classes regularly and is quite the accomplished Lampworker also.
To contact Liz regarding any classes you can contact her via her FB page as well as her website
http://www.creativeartyfacts.com.au/

Lunch was in there somewhere :-)
Tha last class for me was back with Natalie Fletcher-Jones of https://www.facebook.com/Peruzi.net where we would be decorating our hand created ceramic piece

OUR CLEVER TEACHER GIVING US A BIG SMILE FOR THE CAMERA


HERE WE ALL ARE MADLY DECORATING AWAY


Once we had painted out glazes Nat had to cart all of our pieces back with her to her tranquil Qld farm studio setting for there big final firing.
Some of my pieces were starfish & sea urchins,which I really loved creating & then getting them back home to design with.

I do hope you enjoyed reading about the fun & frivolity had by us all at the Retreat. If you are interested in being a part of any of the Retreats please go to the website for all the relevant info http://aussiebeadingretreats.com/

I hope to catch you there sometime, our next retreat is happening in July in Victoria, where I shall be teaching :-).


Tuesday, 9 October 2012

THE BEADING RETREAT; DAY 2

After a few hours sleep in our cabins we woke very early on the Saturday, 6.15am in fact. Showered and ready to go off to breakfast. Whilst waiting for the girls I sit on the steps writing this on my Iphone soaking up the morning fresh air and quiet surroundings. It really is a beautiful place.


Breakfast over, we all toddle off to our first real classes for the day.
Mine was earthenware Clay with Natalie from Peruzi. http://www.peruzi.net/
 A class in which where learn the basic's of making cabochons, pendants and beads.

The beginnings of the creations
End result after 3 hours of creation


The class goes for 3 hours which simply flew by and we created so much and of course meet a couple of more wonderful people, with whom I had not yet had the pleasure. The lovely Yvonne Ireland & Tracy Stillman. Both ladies are very talented designers. You can see Tracy's work at http://www.facebook.com/TracyStillmanDesigns as well as purchase her work through http://www.etsy.com/shop/TracyStillmanDesigns?ref=seller_info

Some photo's of the ladies all hard at work creating master pieces

Tracy & Mandy
Sharon, myself & Tania
Yvonne & Carina
Natalie is a fabulous teacher and made the class such a delight, we all could have stayed and continued creating till the cows came home but alas it was over all too soon and time for a break and clean up before we head off to lunch and into our Afternoon class.

AFTERNOON CLASS

My afternoon class was one I had been very excited about doing as my instructor was non other than the now world published and seed bead extraordinaire Melissa Ingram. I have always admire Melissa's work and talent ever since being published alongside her in one of Australia's leading beading magazines "Australian Beading". This is where I first became aware of her amazing talent.
http://www.aussiebeader.com/
shop online with Melissa for tutorials & supplies
http://www.etsy.com/shop/MIDesign

Today we were being taught Soutache an old technique that has made a resurgence thanks to people such as Melissa.
Melissa modelling our desired outcome for the class
After another 3 hour session most of my Soutache pendant had been completed. Lucky for me that I had not booked a class in the late afternoon two hour slot before dinner and was able to sit in on the next Soutache class and finish up.

My finished Soutache pendant.
Well at this point I was quite exhausted but on cloud nine, so much to take in. I was really looking forward to dinner and a drink or two......Along with my newest friends and to hear about their creations and adventures for the day.

EVENING CLASS

Dinner over and it was time to get into the last class for the evening a nice relaxing class called Kumihimo braiding, run by the very vivacious and fun loving Maria Sfirse.
Maria was very generous with her supplies and time.
The class was a nice quick one and so relaxing, loved the result and such quick gratification. I made one long braided piece and divided it into three bracelets for my girls.


The evening had come to an end. Time to head back to our rooms and have a little fun and get to know more about some of my fellow creative spirits. Kat Gray, Tania Black, Lyndsay Abreu and Mandy Williamson

The Beading Retreat: Day 1

The day starts with double checking everything is packed!
Waiting for my traveling companion Sharon Harper of Purple Tiger creations
Sharon arrives and we are off to the airport. 
Arrive safely & dropped of by my hubby we go through check in and soon to be boarding the plane.
I must admit I am a not a great flyer, so I was a little nervous. Sharon was fabulous as was Karen Cooke our other travelling companion. During the flight Sharon kindly came to check up on me. I flew very well and enjoyed myself to the point where I was taking photos out the window of the plane.


We are meet by a glorious group of woman at the Airport with their cars ready to take all of us that have flown in from Vic & NSW to the Retreat. Now this for many of us is the first time we are meeting each other either IRL or ever.


The chauffeurs where the lovely Natalie, Sue & Debi.
Time for a group shot before we pile into cars and make our way to the retreat.

Arriving at the retreat... Hmmm looks a lot like camp LOL. Unload the cars & time to get settled in our cabins. After many changes of who is sleeping where I have the pleasure of rooming with Lyndsey, Sharon & Tania B.

Lyndsay is a proffcient seed beader who runs http://www.facebook.com/pages/Lyndsays/51813973700?fref=ts and sells her beautiful crafted items through her Etsy store http://www.etsy.com/shop/LynnAbreu.

Tania Black is a well established lampwork artist with her gorgeous items available to purchase through her store http://www.taniablack.com/
After we are all settled the evening holds dinner and a wonderful market night where we can all happily part with our cash. As well as showing off our challenge pieces, based around an image.

Teena's challenge piece using the colours from the  image

A group shot of challenge pieces
Second half of group shot


The market night consists of  tutors and students alike who either own a beading stores or make handcrafted components to sell to beaders.
Present on the evening with their wares were.

Mandy Williamson  of Mimi's Beading
http://www.facebook.com/MimisBeading?ref=ts&fref=ts


Natalie Fletcher Jones of Peruzi
http://www.facebook.com/Peruzi.net?fref=ts
http://www.peruzi.net/


This is myself with Mandy getting to know one another

Maria & Carina of The Bead Room
http://www.facebook.com/TheBeadRoom


I bought up big with Nat, ooohhh how could I resist.


A chance to meet the lovely ladies of The Bead Room.


Admiring the styling of Tania's lampwork skills


This is the work of Melissa an amazing artist to say the least, an opportunity to see close up her recently published and award winning designs

Melissa Ingrim of
http://www.facebook.com/SBJBeadwork?fref=ts
A thoroughly enjoyable first day meeting/greeting/buying and then a some drinks at the end to wind down.
Its off to bed as we are up early tomorrow to get a start on the day.